Showing posts with label baking. Show all posts

Sunday, May 5, 2013

Bringing Sexy Back to the Kitchen with Sugar Baby Aprons

We're bringing sexy back to the kitchen with the dainty and lovely collection from Sugar Baby Aprons.


Fusing together two things I absolutely love, Cooking/Baking and Pretty Designs, Sugar Baby Aprons is bringing back the sexy domesticated diva a la 50's Pin-up allure with their collection of foxy and appealing aprons.

Throw away your old frazzled apron and brighten up your kitchen and add some spark to your baking dance with these super cute aprons.

I received the Pink Perfect Damask Apron (ARV $45.99) and was absolutely thrilled to start baking in this gorgeous frock. Prices start from $39.99 depending on the style.

Ready to bake!

This fun and flirty apron puts a little flair and sassiness in your kitchen!  So adorable that you’ll want to wear it not only to cook in but to serve your guests too!  Double it’s usage by using this retro style apron while you house clean.  Wearing something this adorable can only make you whistle while you work for sure and feel pretty while cleaning!  Is that possible? Of course it is! Well, it can be now thanks to Sugar Baby Aprons.

It also came with the matching heart-shaped pot holder. Super cute!


They've got a fabulous collection to suit all tastes and styles.  They even have a Parisian one that I can't wait to get my hands on!

Good riddance to the monotonous lady of the house!
Because there's nothing more sexier than a confident, hard-working woman. Cheers to that!

To learn more about Sugar Baby Aprons, visit them at www.sugarbabyaprons.com.

Courtesy of the lovely ladies behind Sugar Baby Aprons, one of my spicy readers will win one of their own Sugar Baby Aprons!


To enter this contest, simply enter via rafflecopter below.
Contest ends May 19, 2013.
*Open to Canadian Residents only.

a Rafflecopter giveaway
Read More

Thursday, January 3, 2013

The Chewiest & Yummiest Chocolate Chip Cookie Recipe EVER

Call me the Cookie Monster, Cookie Snob, Cookie Connoisseur... whatever you want to call me, I clearly love my cookies.
Well, I love my desserts period, but cookies are one of my ultimate favourites.
It takes me back to those moments in childhood -- the smell of freshly baked cookies in mom's kitchen, coming home from school with a fresh batch waiting for you with a tall glass of milk.  Even those moments of adolescent heartbreak or "frienemy" drama; those edible bites of comfort always hit the spot.

As the years went by, my passion for baking evolved. Especially after being a mother, when your little ones would expect to indulge in some of mom's home-made confections.

The classic chocolate chip cookie has always been a favourite of mine, but now also one of my daughters and my husbands.
I don't know about you but I like my chocolate chip cookie chewy and perfectly sweetened (not too much, not too little).
After many failed attempts at having the perfect chocolate chip cookie that was not only perfectly and deliciously chewy after coming out of the oven, but lasted for days and maintained it's texture and taste, I FINALLY found the perfect recipe!

Beware: These cookies are so good, you will eat a whole plate without realizing it.
Buh-bye New Years Resolution? Hey, totally okay to indulge every now and then (deprivation is what makes for failed diets, right?)


So go ahead and throw away those other recipes, this is the one you will keep and use every single time.
Chewy, buttery, soft and oh-so-yummo!


The Chewiest & Yummiest Chocolate Chip Cookies EVER
adapted from: Anna Olson

Ingredients:

  • 3/4 c. unsalted butter, softened
  • 3/4 c. brown sugar
  • 1/4 c. sugar
  • 1 egg
  • 2 tsp. vanilla extract
  • 2 c. all-purpose flour
  • 2 tsp. cornstarch (this is the secret ingredient!)
  • 1 tsp. baking soda
  • 1/2 tsp. salt
  • chocolate chips, as many as you like

Instructions:
Preheat oven to 350 degrees.  Cream together butter, brown sugar and sugar until light and fluffy.  Add the egg and vanilla and beat to combine.  Combine the flour, cornstarch, baking soda and salt and add to wet ingredients.  Mix to combine and stir in the chocolate chips.  Chill dough for at least 30 minutes.  Use a small cookie scoop and drop dough onto a greased cookie sheet.  Bake 8-10 minutes or until barely golden around the edges.  The key is to NOT overbake.

If the dough looks a little crumbly while mixing, don't worry, it will come together. I get between 27 and 30 cookies and I bake them for 10 minutes (NO LONGER).  They will look underdone, but they set up perfectly.

Enjoy! And thank me later.
Read More

Monday, June 25, 2012

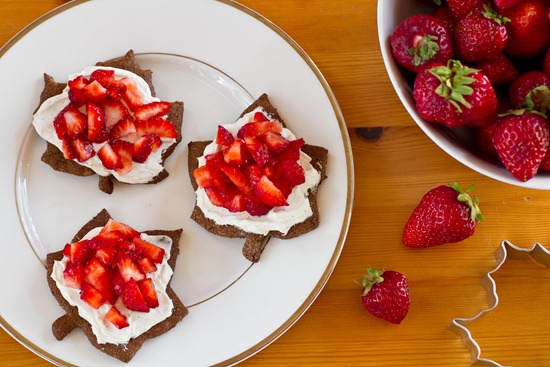
Canada Day Treat: Strawberry Cheesecake Bites

If there's one thing aside from being a mother that I am tremendously proud of is the wonderful country that I live in, Canada.
This coming Sunday, Canada celebrates it's big Birthday with a bang! Literally!

Every Canada's Day, we have a big family BBQ, complete with delicious Canada Day themed treats, dressed in our Canada Day gear waving our flags and at the end of the day we make sure to catch the light show in the sky.

I always like to be creative when celebrating Canada Day in my home and usually will go to the food or dessert to allow my visionary juices to flow.

I came across this seriously adorable Canada Day treat on Oh She Glows' website and knew right away that this is what I'll be making this Canada Day!


Our local Farms are busy harvesting some delicious strawberries and for those that didn't know, I am a Strawberry fanatic.
Any excuse to grab more strawberries is good -- yes, I may have a problem.

And of course, Canada Day is all about the Red and White!

These delicious treats offer a freshness and coolness perfect for the weather and will be sure to get your guests happy and satisfied. Not to mention, build the great Canadian pride!
It's also a great treat to make with your children, just simply allow them to spread the cream cheese frosting and sprinkle the strawberries! 


Strawberry Cheesecake Bites

Ingredients:
  • Homemade or store-bought graham crackers
  • 1 tub non-dairy cream cheese (or regular if you prefer)
  • 1/2 cup- 3/4 cup icing sugar (confectioner’s)
  • 2 vanilla beans or 1 tsp fresh lemon juice
  • 1 pint strawberries, hulled and diced
  • Sugar, for sprinkling

Directions:

1. Make your homemade graham crackers in advance or simply purchase graham crackers from the store.
Recipe for delicious Peanut Butter Graham Crackers here.

2. In a mixing bowl, beat the cream cheese until fluffy. Slowly add the icing sugar to taste. Add in a couple scraped vanilla beans and maple extract or a teaspoon of fresh lemon juice if you prefer. Store in fridge. You can also make this in advance!

3. Hull a pint of strawberries and dice.

4. Lay your graham crackers onto a large serving plate and spread with cream cheese frosting. Sprinkle on diced strawberries and sugar.

Notes: The homemade graham cracker recipe make about 13-15 maple leafs, so you may want to double the batch. 1 tub of cream cheese should cover about 25 maple leafs depending on how much you use.

Be sure to bake your graham crackers a couple minutes longer (abt 17-18 minutes) so they get extra crispy once cooled. That ensures that the cream cheese frosting won’t make the cracker get soggy (it will get a bit soft after 20-30 minutes, but not too much).

You can purchase your maple leaf cutter at Golda's or McCall's


Enjoy! 

Read More
Related Posts Plugin for WordPress, Blogger...

© 2011 Carol Au Courant, AllRightsReserved.